Skinning an avatar involves a collection of 2D textures that are applied to the base avatar's meshes in very specific ways. They're layered onto the avatar in a specific order. See the graphic below. The lower layers are partially or fully covered by the ones above them.

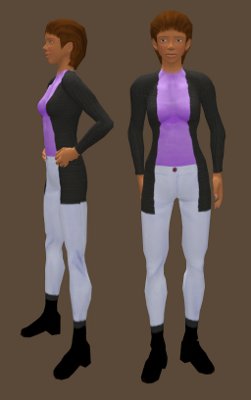
Ruth, the original avatar, is made entirely of base avatar components. Fortunately for us, we don't have to look like Ruth.
To make skin or clothing with your name as creator, you must create a new item of the appropriate type. You can right-click in inventory and create new clothing or body parts. To edit one, wear it then right click and choose edit.
There's six templates for avatar skinning: head, chest and arms, hips and legs, eyes, hair, and skirt. The official templates are here. I recommend you start with both Robin's and Chip's.
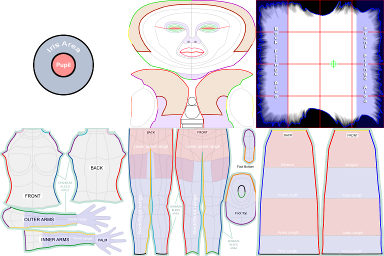
There's only one arm and one foot on the templates. Both arms are textured to appear identical, the same is true of the feet.
Clothing and skin textures (except for eye textures) are shrunk to 512x512 pixels when displayed. Avoid uploading larger textures for these uses - you and your graphics editor will do a better job shrinking the texture.
Seeing odd colored edges on some of your textures? Try blurring the colors over the outlines - color outside the lines. If you get an odd line or plus sign on the back of the head, try pulling the mouth texture further inside the outlines.
Tools
The Second Life Wiki keeps a list of tools.
You'll need a 2D graphics editor that handles layers. Most people seem to use Photoshop or the freely available GIMP.
To save money on downloads, there's tools like AvPainter or the freely available SL Clothes Previewer. The Aditi test grid can also be used to test skinning freely, or you could run a personal sim.
Skin Layer
A skin requires three textures, one each based from the head, the chest and arms, and the hips and legs templates. To create a new skin, first make a new skin item in inventory. Wear the skin, choose Edit. Add your textures to the three boxes confusingly named Head Tattoos, Upper Tattoos, and Lower Tattoos.
Transparency on textures applied to the skin layer allows the default avatar skin to show. Most skin textures do leave a small corner on the upper right of the head texture transparent - this is for the default eyelashes. If you fill that area in with solid colors, the default eyelashes will look like a solid colored block.
Eloh Eliot has released several skins as templates. Natalia has a skin making tutorial here 1 2
Tattoo Layer
The tattoo layer was introduced with the Viewer 2 client. Older clients and those based off of an earlier version of the viewer may not allow you to wear a tattoo layer.
A tattoo requires three textures, same as a skin. The Tattoo section of Appearance mode can be found in the Clothes section of the interface. When making something for the tattoo layer that doesn't cover all three sections of the avatar body, use transparent textures or "none" for the unused areas. Transparency on a texture applied to the tattoo layer allows the skin layer to show through. The tattoo layer can be colored inworld while being edited.
Besides tattoos, these are popular for facial and body hair, and makeup.
Clothing Layers
Clothing layers are worn on top of tattoo and skin layers. Transparency on textures applied to clothing layers allows lower layers (clothing, tattoo, and skin) to show. Clothing layers (other than the jacket layer) are made of a single texture. The jacket layer is made of two textures. Applying textures involves wearing the clothing item and adding the texture to the box(es) in the interface.
Skirts are another mesh with a texture applied. There's a number of sliders that control the shape of the mesh. When you wear a skirt you can apply a texture the same way as with other clothing.
Shoes, shirts and pants have sliders that change the shape of the basic avatar mesh. This lets you create shoe shapes that have blunt or pointed toes, and flared sleeves or bell bottomed pants.
There's dozens of clothing tutorials available, but here's two clothing tutorials I like from Natalia: Creating clothes with the GIMP, and with Photoshop.
Eyes Layer
To use a texture, go into Appearance mode, choose Eyes, place your texture into the Applied Texture box, and save. The texture is applied to both eyes.
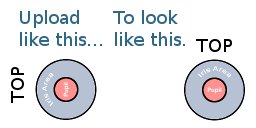
When creating eye textures, rotate the final result 90 degrees counterclockwise - SL automatically rotates textures 90 degrees clockwise on eyes.
Unlike other avatar skinning textures, eye textures are adjusted to be 256x256 pixels.
Here's some tutorials showing different methods of making eye textures. Kris Costa's., Adam Dorman's, N-sane Art's
To make different colored eyes, attach an appropriately textured prim over one eye. You can use prims over eyes to create "glowing" eyes with fullbright or glow.
Default Hair
Default hair is a combination of a slider-deformable mesh and a texture. It is very rarely seen, most people prefer to be bald or use prim hair. Some skin textures have (usually very short) hair drawn on them.
If you're going to wear prim hair, or just like the look of a shiny scalp, you'll want to wear a "bald" base avatar hair. Create a new Hair body part in your inventory. Wear it. Open the Appearance menu, go to Hair. Set the texture to a transparent texture (there is one in your Library.) Save, and rename the Hair to "Bald" in your inventory.